Pages

Showing posts with label Quilts. Show all posts

Friday, July 20, 2018

In the Sewing Room ~ Kim Diehl Wall Quilt

I had an email earlier this week from my local quilt shop back home in West Virginia, reminding me about their upcoming shop hop across the state--WV Mountain Quest. It brought back some good memories of the shop and classes I took that were taught by my neighbor and good friend.

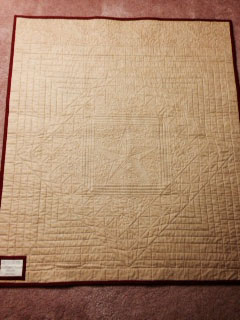
I was reminded about a quilt top that I pieced in one of the classes right before we moved, so I brought it out today to finish up with the quilting. It's 20" x 20", and as you can see by the quarter that's lying toward the bottom left of the center section, the pieces are pretty small.

That means lots of seams, which can be a bit tedious to hand quilt. I'm mostly stitching in the ditch since there's enough interest going on with the piecing, so if I stay on the downhill side, I should be okay. I like to do lap quilting. The rhythm of the stitching is relaxing, so I'll see how it's going this evening.

If you're a quilter, you might recognize Kim Diehl's pattern "Laundry Day." One of the things I like about Kim's fabric is that whatever she designs coordinates with anything she had designed in the past. This quilt pattern is part of her Simple Whatnots Club Collection 1. I think I've made a half dozen or so of her quilts and posted a few of them here. But look here at some images of Kim's quilts if you really want to see some quilted inspiration! And here's a brief bio about her.

I hope you're having some time to express some creativity in your home, too. Of course, it doesn't have to be sewing or anything "crafty" at all. It's just anything that shows a new idea, even just a new way of expressing something that has inspired your own imagination. There's nothing new under the sun, but there are lots of ideas to tweak for our own "creation."

It's one of the ways we're created in the image of God. Creativity!

Friday, October 21, 2016

From the Sewing Room ~ Hagrid's Quilt

https://www.wbstudiotour.co.uk/-/media/images/wb-studio-tour/pages/the-tour-experience/explore-the-studio-tour/explore_hagrids_hut.jpg

My daughter has taken a liking to Hagrid's Hut. She's in the process of decorating a sitting room like that. She found a similar chair on Craig's list, a lantern on Etsy, a few other items here and there, and is on the hunt for adding little touches every now and then to bring it together.

I googled pictures of Hagrid's Hut to see what she's going for (to each his own!), and my eye caught the quilt thrown across his chair. Upon closer examination, I see that it's all scrappy and mis-matched--I suppose as a mid-sized giant who lives in a hut in the forest would have it. I thought it would be a nice surprise if I made a similar one for her.

The mis-matching took much more time than if I could have worked with strip sets, but I wanted it to resemble Hagrid's quilt as much as I could manage from the pictures. It doesn't look like much yet, but I've finished the center portion of the quilt so far. Some washing and putting it in the sun to fade will help bring about the "look."


When she came to pick up the kiddos after their visit with us, she was talking about her Hagrid room. In the conversation, she mentioned the quilt--that someday she may have the time to make it. Although I had intended to surprise her with it, I couldn't contain myself and showed it to her. She was elated! As I finish working on it, I know it will be excitedly received. Joy to a quilter's heart!

Friday, September 9, 2016

From the Sewing Room ~ Learning Needleturn Applique

Two or three years ago on one of our day trips, I purchased a Stitchers Garden kit at a quilt shop along the way. The sample hanging in the shop was stunning, so I decided to get the block-of-the-month kit to work on for my little granddaughter, who was a little over a year old at the time. I figured I had plenty of time to complete it before she'd be in a bed big enough for it to grace. Little Anna is now four, and I've finished twelve of the fifteen blocks (there are 3 extras, so we get a choice of which 12 to use in the quilt). I'm almost ready to decide which 12 I'd like to use. I'll probably choose fewer blocks since I'll probably size it to be for a twin bed.

My quilt will undoubtedly not look like the sample, though, because when I purchased it, I didn't realize that it was a kit for a class the shop was offering on learning to use decorative stitches and techniques like pintucking, couching, fringing, using various presser feet. But, not to be undone, I decided to learn needle turn applique on the blocks. Some of the shapes didn't lend themselves readily to needleturn, but I gleaned quite a bit by watching Jan Patek's tutorials on the Missouri Star Quilt Company site as well as some other tutorials. I think I've been improving somewhat block by block.

One of the key techniques for me to learn was using a long, slender milliner's needle. I have a long, long way to go to get needleturn applique mastered, but here are a couple my practice blocks.


Linking up today with Amanda Jean at Crazy Mom Quilts for Finish It Up Friday.


Friday, August 5, 2016

From The Sewing Room ~ A Puppy Quilt


Sharing a picture today of my latest quilt, made for our newest grandbaby. His bedroom theme is puppies, and his mommy sent a photo of her "imagined nursery" with a similar quilt hanging on the wall behind the baby bed. I'm supposing it was a quilt, although I couldn't see any quilting on it. That quilt had three other animals, which I changed to puppies. The center background is a light gray, which coordinates with her rocker. Below is a close-up of the quilting.


The puppies are quilted in mini-meandering, with a medium meandering in the gray background. The orange stripes are sort of a ziggy-zaggy quilting, and the white stripes are a flowing vertical back and forth quilting. I tried a new-to-me quilting design in all the navy negative space. It's a variation of tiling filled with meandering. I learned this design in an Angela Walters Craftsy class. She showed how to do it on a long arm machine, which looked pretty simple--on a long arm machine. It was much more of a challenge on my home machine, but I was able to make it look pretty good as I struggled along. I probably wouldn't use that design again, though, unless it was a smaller quilt that was easier to manage. If you'd like to see a bit more of an explanation of Angela's design, you can see it here.

Friday, August 28, 2015

From the Sewing Room ~ Twilight Kaleidoscope Quilt

I finished the Twilight Kaleidoscope Quilt top today. Woo Hoo!! Going to take it to the quilt shop next week for quilting. This is the largest quilt I've made (63 x 89), and I don't think I'm up to trying to quilt it on my home machine right now. Don't have the time with getting ready to move to slow down and give it a go. This is the first quilting that I've had someone else do, so I'm hoping I like the results.

The Twilight Kaleidoscope Quilt is from the Quilted Kaleidoscopes Craftsy class taught by Marilyn Foreman. Love those Craftsy classes! I've made a few octagon kaleidoscope throw/baby/tablerunner quilts, but had not been very interested in four patch kaleidoscopes until I saw Marilyn's class on Craftsy. I thought her Twilight Kaleidoscopes was beautiful and the kaleidoscopes looked so much easier and took less fabric. And I love the way she has them set into the quilt.

I had been wanting to make a quilt for a friend before I move, and I thought this would be the one. So I had her choose from some large prints in my stash for the main fabric, and then I added other fabrics to bring it all together. She likes a red/black combo, so I used black as the background and red as the inner border. The backing is the same fabric as the inner border. If I do another quilt like this, though, I think I'll have each star block to be a different color. I chose to do three red star blocks because I wanted to highlight red, but I think more variety might have been a better choice since I added the red border and red backing.

Here are the fabrics that I used, mostly from my stash. I did purchase the wide red backing, so I didn't have to piece it. I cut some from it for the inner border. This is an after photo, and I didn't have much of the large floral left. It was a good choice for the kaleidoscopes.


 A couple more pictures.


My friend and I have been walking partners for several years, trying to connect with each other each week or so. I call it our walk/talk time, as we point one another Upward and Homeward. We've been friends for about 25 years. I'll truly miss those walks and talks with her.

I hope you have someone, too, who points you Upward and Homeward.

Linking up with Amanda Jean at crazymomquilts.com for Finish It Up Friday. If you're into sewing or quilting, head on over there for lots of wonderful inspiration!

If you've stopped by from Amanda Jean's, I do hope you'll linger awhile here at Homeward

Unitil next time!

Friday, August 7, 2015

Because of the Brave

On a recent visit with my parents near Father's Day, I gave Dad a lap quilt that I had made especially for him. Dad is a WWII veteran, and I wanted to honor him with the quilt, so I named it after Moda's fabric line "Because of the Brave." 

I had seen a Quilted in Honor design on The Electric Quilt blog challenge and wanted to make something similar for Dad. It was just a design entry for the contest and hadn't been made into a pattern. But it inspired me, so I did what I could to bring it to life. I altered the design somewhat to make it what I wanted it to be. 

This was the most challenging quilt I've attempted without a pattern. Getting all the measurements to come out right challenged me, indeed! 


Some detail on the back of the machine quilting.


Happy stitching to those of you who sew! Maybe make something for someone soon. :-)
And keep looking upward and homeward!
~ Vickie

Thursday, March 19, 2015

Making Amends

I spent some time today hand quilting. I've got four kaleidoscopes finished, doing a petal design in each section. Hand quilting is much slower, of course, but I find it much more relaxing and controllable than quilting with my home sewing machine. Now if I had a long arm machine.... :-)

I took the top to my local quilt shop a couple of days ago to match some border and backing fabric, and whenever anyone brings a quilt top in or a quilt gets picked up after being quilted, there's always show and tell. So some gals were looking at my kaleidoscope top, and as we all do when we see a quilt, they oohed and ahhed. Then one of the gals said something like, "I see you got all of your points matched; no, there's a couple there you missed." Well, of course, that was a little deflating, and I thought a bit tacky to say!

I was going to start the quilting yesterday, but as I thought about the comment, I was back and forth with, "I'm not stuck on it being perfect," but "I could take the time to make the correction, but "I didn't think it was that noticeable," but "now I see it right away myself whenever I look at it." Argh!! So I got to thinking that if she noticed it right away, that it was probably more noticeable than I thought.

So, I decided to fix the mis-matches and then found a hole in one of the pieces where I'd apparently torn it with the seam ripper. So I had to replace that piece in the middle of the quilt before I could get started. Actually, it turned out to be a good thing that I was reworking a row or I wouldn't have noticed the hole until I came to it for quilting, which would be a lot more work. And if it had gone unnoticed, at the first washing it would certainly have made itself known.

The comment and subsequent fix got me to thinking how much like that I am with some of my own weaknesses. Especially when one is pointed out to me, and I have that deflated, defensive response. I struggle with amending my ways because I think they're not so noticeable. To me, they aren't. To others they may be.

We're often blind to our own weaknesses, and it's really to our benefit to have them pointed out.

Hopefully, though, not in a tacky way.

Wednesday, March 4, 2015

Small and Simple, But Oh, So Essential!


There it is, right where I left it. Small, but sew essential!

I wasn't sure if I would go to quilt class today. We were under a flood watch with heavier rains expected toward the afternoon, and I don't like driving on the interstate in the rain, even though it's just a 20-minute drive. But since the class was in the morning, I figured I would be back before any flooding. Wanting to spend some time at the quilt shop outweighed my concern on the highway. Some of you know how that is!

So, after driving carefully (and being annoyed by all the trucks throwing water and making it difficult to see), I arrived at the quilt shop, got everything unpacked, my little iron and sewing machine plugged in, and sat down to thread the machine. What's this? No bobbin case? Ugh!! I had absent-mindedly forgot to put it back into the machine in my preparations to leave. No bobbin case, no sewing.

So, I chatted a bit, drooled over some fabric, purchased a fat quarter, and headed home, thinking that, at least, I would be getting safely home before any flooding. Hauling my gear back upstairs to the sewing room, there it was.... I had left the bobbin case on the sewing cabinet as I had packed up to head out this morning.

Some things are essential, no matter how small or simple. A bobbin case...not much to it. A Bernina machine (er, excuse me, a Bernina computer), that I'm sure I don't understand a fraction of what it can do. But it wasn't capable of doing anything at quilt class today without that one simple, small, essential part. 

We're all essential in some way, even if it's a simple, small way. Some things just don't function without us. And if you're a child of God, you're gifted in some particular way. There's purpose in your gift that's bigger than you.

As each one has received a gift, 
employ it in serving one another 
as good stewards of the manifold grace of God. 
~ 1 Peter 4:10 ~

I spent some afternoon time in my sewing room, alone, working on today's quilt class assignment. Here's my progress .....


Friday, February 27, 2015

From the Sewing Room ~ Prairie Star Posies


I had completed Kim Diehl's Prairie Star Posies wall quilt recently, but wasn't quite satisfied with it after it was hung over the bed. Looking at it day after day, I realized that some of the stamen in the posies just weren't the right fabric choices. So, I replaced a few of them today, and I think it looks much better.

Here's a little closer view. 


The quilt measures 40 x 40 and is made up of squares and half-square triangle units. It was an easy pattern, with the bulk of the work in the applique. I used Kim's applique technique using freezer paper. It's machine appliqued with monofilament thread, which is practically invisible and allows the fabric to be seen and not the thread. When I replaced the few stamen, I hand appliqued with silk thread. Silk thread is almost invisible, too, and gives a nice finish to the applique.

I enjoy hand quilting small projects in the evenings, which is what I did on this quilt.

The back shows the quilting better.
 

There was one quilt in Kim's selections for the book that there wasn't room for,. If you click on the book, it will take you to the Martingale site for a free download of the 60 x 60 quilt Buttercream Crisp, with checkerboard blocks, as well as a free bonus download for a table runner.  Now that's pretty thoughtful!

http://blog.shopmartingale.com/quilting-sewing/free-patchwork-download-from-kim-diehl/

Linking up today with crazy mom quilts for Finish It Up Friday. If you're a quilter, you'll want to check it out. Lots and lots of inspiration over there!

Friday, February 20, 2015

In The Sewing Room

I spent some time this afternoon in the sewing room while My Beloved had an appointment and ran some errands. I made some progress on my kaleidoscope quilt that I'm gifting, but alas, I think I'm going to take it out. I don't care for the tan that I added. I was trying to use fabric that I had in my stash and not go out in this cold weather, but it isn't working.

I'm not quite sure what to use in the secondary blocks instead. The color wheel says a mauve. Maybe that's what I should go with. The carpet I laid the kaleidoscopes on to take a picture is mauve, and it highlighted them well.

Hmmm. Maybe the green I have them set in should be mauve instead. No, no. Too much ripping. And her favorite color is green, which is why I chose it. Maybe I shouldn't have a secondary block going on at all, just the kaleidoscopes and sashing. But I think the secondary blocks would give the quilt some variety.

The weather forecast is calling for dangerous driving conditions here tomorrow, so I won't be able to go to the quilt shop until Tuesday (closed Mondays). You'd think in all the fabric stash I have that I would have something that would work!
 
This is one of the kaleidoscope blocks that shows the colors. Any ideas on what to switch out the tan for? Maybe the mauve?  Well, I have a few days to think about it. I'll work on something else in the meanwhile.  Like maybe catch up on my quilt class homework!

If the weather is keeping you inside, I hope you have something pleasant to do as well. Stay warm and safe!
                                                                  ~ Vickie
.
.
.

LinkWithin

Related Posts Plugin for WordPress, Blogger...